6 Tips for Fluid Arms and Hands in Belly Dance
This article first appeared on BellydanceU dot net on March 20, 2016. Sadly, that website is no more, but some of the articles live on. Enjoy!
1. Back Muscles
Fluid arms disguise the hard work behind the beauty. While they may appear to be floaty, there is a great deal of muscular engagement through the arms, shoulders, and back.
One way we hide that work is to appear relaxed by keeping our shoulders down, letting the expressive line of our necks be as long as possible.
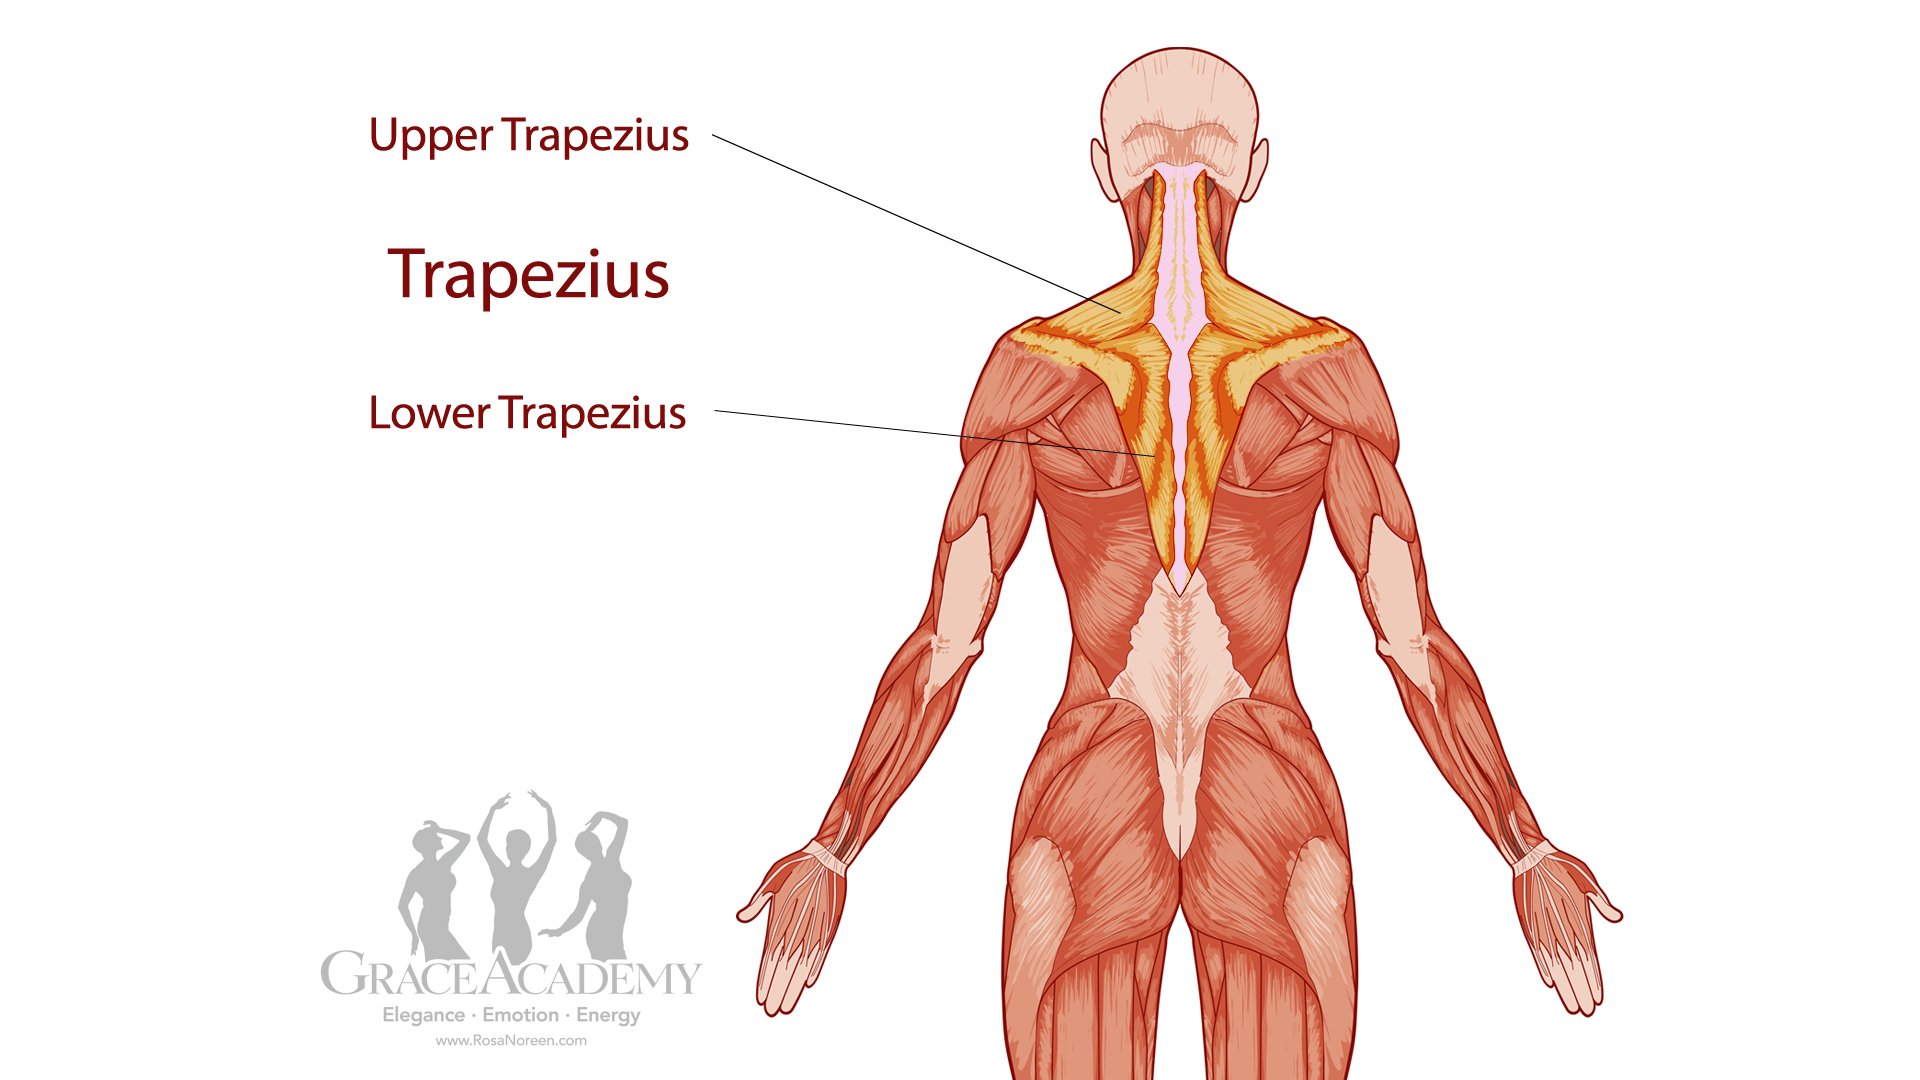
Trapeziuz muscles
To keep your shoulders down, use your back muscles; specifically the lower trapezius. This muscle makes the shape of an inverted triangle between and below your shoulder blades.
The upper trapezius muscles run down your neck and over the inner top part of your shoulders. These help you shrug, pulling your shoulders up.
As you raise your arms, actively work to relax the upper trapezius, instead using the lower trapezius to keep your shoulders as far away from your ears as possible.
Photo by Rebecca Waldron
2. Lower trunk
While we are working hard on the upper body, it's easy to forget you hips and lower back. To keep your body happy, it is essential to protect your back. Be sure to keep your pelvis and your ribcage stabilized while being expressive with your arms.
We all have different shapes, and we need to take into consideration the difference between flesh shape and bone structure when talking about posture.
The first goal is to find and maintain a neutral pelvis. We are not trying to achieve a fully flat back. For most people this is impossible as we have a natural curve in our spines and muscles and flesh behind. We don't want to eliminate the spine curve entirely; instead we want to elongate, dropping the tailbone, it so that the lower back muscles are not actively engaging to lift your behind.
The second goal is to engage your upper abs to stabilize your ribcage. Thing of a zipper running from your pubic bone (front of pelvis) to your solar plexus (where your ribcage comes together just below the bust). The lower part will keep your pelvis in neutral. The upper part will keep your ribcage stabilized.
Gently put one or more fingers between your ribs in your solar plexus. Loudly say, "ha!" to find the muscle engagement needed to pinch your fingers with your ribs. Then, try to find that same muscle engagement without the exclamation. Holding these muscles strong while working with your arms will help to protect your back, keeping your happy and healthy!
3. Transitions
Photo by Yasmina of Cairo
The appearance of fluidity is dependent on smooth transitions. If you simply stop and robotically go to the next position, fluidity is lost.
Don't just throw away the old movement. Finish the old movement by allowing its momentum to travel all the way through your fingertips before (or while) you begin the new movement. Give each movement space to breathe and to be itself.
As you change direction or texture, acknowledge and finish the original movement. Don't cut corners. You can round the corners, certainly, but do so deliberately, following a path. You can stop the movement or you can flow into the next one, depending on your musical, stylistic, and aesthetic wishes; do so deliberately.
4. Hands and fingers
While your fingers may feel like the last thing you think about, they are actually one of the most visible parts of your body since they are furthest away from your core.
Photo by Amanda Gagnon
If they are listless, they will take away from the effect of your dance. If they are fluid and strong, they will project your energy well beyond your physical sphere.
Many of us have tight muscles in our hands from typing or other daily tasks. It can be a challenge to elongate the hands.
Rather than pinching the middle finger and thumb into a tented hand, try keeping a long line from your shoulder all the way through the tip of your middle finger. Don't let the middle finger droop, breaking that line. From there, lift your other fingers, so there is a slight upturn to your hands.
Be sure to put energy into your knuckles. Gently lift your fingertips and press the base of your fingers down, opening your palm and the undersides of your fingers.
Lift the top of your wrist, reversing this movement, and then press again through your knuckles, continually imagining that you are creating more space between your bones.
5. Modulate smooth movements
When moving your arms slowly from one position to another, we sometimes get to the next position too soon.
To avoid this, link your arm positions to your body movements or to the counts in the music.
For instance, if you wish to take 8 counts to smoothly move one arm in a half circle from a position above your head to a position framing your hips, cut that path into sections. After 2 counts you need your arm to be at an upward diagonal. After 4 counts it should be out to the side. After 6 counts, it should be at a low diagonal. Finally, after 8 counts, it arrives at the low position.
Be sure that all arm movements are anchored in your center. Use your muscles to move your arms, rather than flinging them up, down, or out.
You can layer the arm movement over body movements like hip drops or traveling steps. At first your movements may be choppy. But with deliberate and continued practice they will smooth out.
6. Breathe
Photo by Amanda Gagnon
Last but not least, remember to breathe! This truly helps with your fluidity.
Since we are using a lot of muscle to move our arms, we need to avoid stiffness. Training yourself to keep your breath flowing will open up many options.
Breath can convey relaxation, excitement, anticipation, drama, and power. If your dance needs a relaxed and happy feeling, you will breath differently than you would when your dance is dark or dramatic. But both require deliberate airflow.
Allow yourself to breathe deeply into your belly, connecting with that spot where you feel butterflies.
When moving your arms on a slow path, use deep breaths that last for all or half of that path. To acknowledge a transition, change your breath from in to out, or vice versa. To flow smoothly into the next path, continue with the same breath.
Keeping the oxygen flowing helps to give your muscles what they need to keep working. Help your body out!
Want to go deeper? Check out A Dancer’s Hands & Arms. This 2-hour instructional video starts with detailed technique explanations followed by drills targeted to each skill, enabling you to eliminate floppy arms and pointy elbows in favor of clean frames and fluid movement!
"I've been dancing for about a decade, and this DVD still had plenty to teach me. Rosa breaks every concept down cleanly before teaching, then drilling the moves. She then builds upon the drills by adding layers, then traveling steps. The sections on adding epaulement to one's moves were especially welcome, given how physically rigid some bellydance instruction can be.
This also has some of the best instructional pacing I've seen on a bellydance DVD. Only once did I feel that I already knew a move well enough that I fast-forwarded through the instructional section, but in fairness, it's a move I'd had taught to me in multiple workshops. I'll be revisiting the instructional sections on this several more times, and foresee it being added to my rotation of drilling DVDs once I feel comfortable enough with the moves and concepts."
- Jennifer


